July is here already and a great new theme for this months challenge…create a 3D card. If you pop over to the AAA Birthday blog you will see the amazing 3D cards the Design Team have created and a special welcome toRachelleas this months guest designer…she has created another STUNNING card this month to inspire you.
Another new month has snuck up on us and it’s time for the June challenge at AAA Birthday. This month we want to see cards using vellum. Hop on over to the AAA Birthday blog and see what the Design Team have created and a special welcome toIzzy Scrapas this months guest designer…she has created a STUNNING card this month to inspire you.
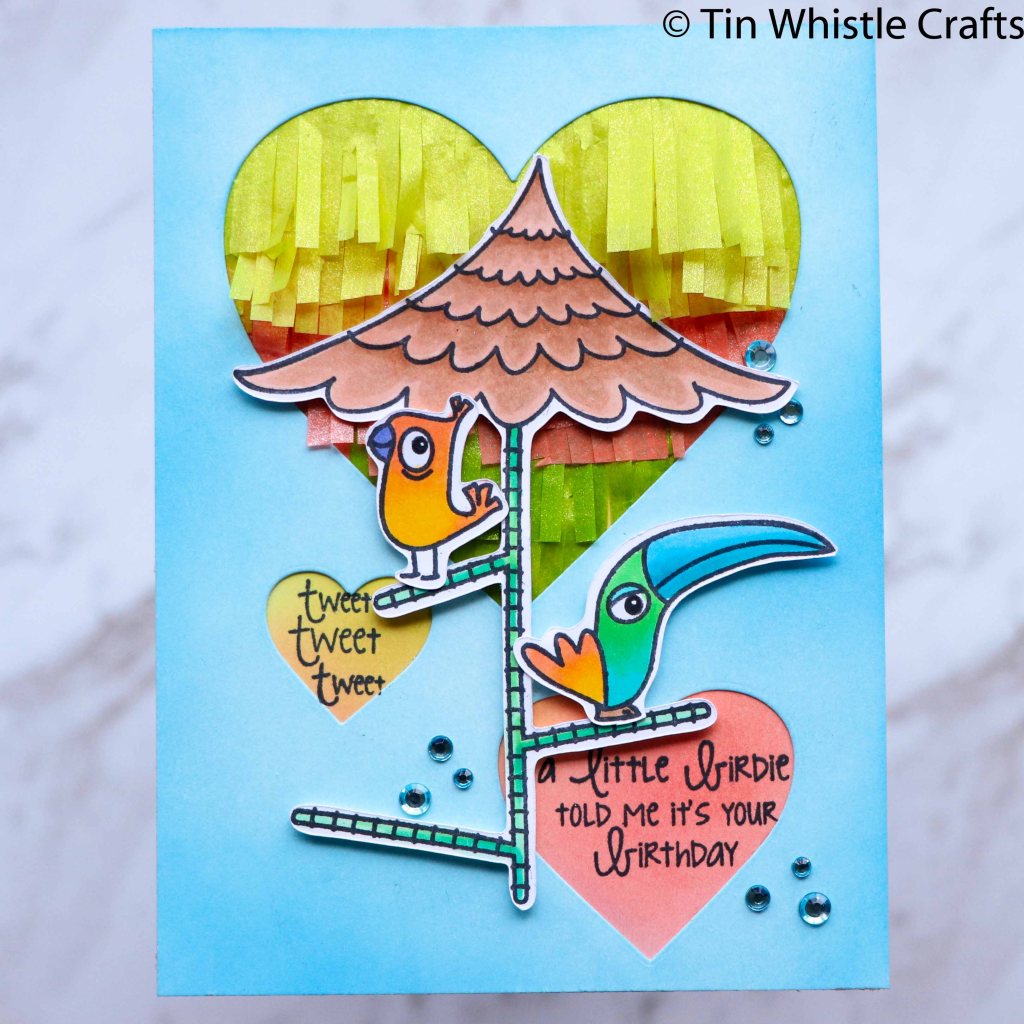
Stamp images on your preferred alcohol marker cardstock, colour and cut out. I used my Brother Scan N Cut. Colours used as follows:
image
Copic colours
Toucan
Y35/YR02, G14/BG15, BG02/05/07
Orange Bird
Y35, YR02, BV04
Umbrella
E11/E23, G02/G14/G16
Background
Top Layer
Cut out hearts using die (this die set puts stitched lines around hearts but that wasn’t the part I used on this card – I’ll put those aside for another card)
Ink blend with Tumbled Glass and Salty Ocean
Card Base
Ink blend distress oxide inks Abandoned Coral and Twisted Citron over background.
Adhere three colours of fringed frosted tissue to base to fill large heart shape.
Adhere top layer to card base.
Sentiments
Line up sentiments in cut out of two smaller hearts and stamp with black ink.
Finishing
Adhere all images using dimensional adhesive foam tape.
I made this card to enter into two challenges – Case this Sketch (I turned the sketch on its side) and Time Out Challenges. I love the Stacey Yacula stamp sets produced by My Favorite Things.
products used
Derwent Inktense Pencils (see colours below)
My Favorite Things Stacey Yacula Sky High
AltenewCircled Sentiments
Altenew Ink Razzleberry
Blue Cardstock
Distress OxideSalty Ocean
Memory BoxStitched Rectangles
Heidi Swapp Washi Tape
Foil Washi Tape
Images
Stamp images on your preferred watercolour cardstock, colour using Derwent Inktense Pencils and cut out. I used my Brother Scan N Cut. Colours used as follows:
image
Inktense colours
Plane
Felt Green
Fox
Willow/Baked Earth
Hedgehog
Baked Earth
Flag
Fuschia
Clouds
Indian Ink
Bird
Iris Blue/Baked Earth
Background
Cut rectangle out of blue cardstock with stitched die.
Sponge Distress Oxide Salty Ocean around edges.
Adhere to cardbase.
Sentiment
Stamp circle sentiment onto white cardstock with Altenew Razzleberry ink
Cut out with a circle die. I used a larger die so it had a border around it.
Finishing
Adhere all images using dimensional adhesive foam tape.
I added the dotted washi tape to white cardstock and cut into two strips. I wanted to add some extra green into scene so I added a strip of green foil tape to background first.
Using Distress Oxides – ink blended three colours randomly over background. Repeat until desired colour depth achieved.
Making sure ink is dry (blast it with your heat gun to speed drying up), stamp Tiny Stars randomly over background using Versamark Ink, turning stamp around to achieve a more random layout of stars. Sprinkle embossing powder over, tap off excess and set with your heat gun.
Die Cut background using the Verso Frame (also diecut the cardbase using the larger die to have a slightly shaped card).
Images
Stamp images on your preferred copic friendly cardstock and fussy cut up to stamped edges. Colours used as follows:
image
colours
Scroll
W0, W1, W3, W5
Spider and Shoes
V12, V14, V17
Cider jar, trim on wizard and tab
G12, G14, G16, G17
Wizard clothes
B000, B00, B02, B05 B18
Skin
E0000, E00, E02, BV01
Facial Hair
C0, C1, C3, C5
Extra items
shelf and tab
Blend copic ink over cardstock (using same blues and greens as in other images)
Die cut shapes
Wizard’s stars
I initially coloured the stars but as I fussy cut the wizard out I realised that the stars were going to be too fiddly to fussy cut so I cut them off.
I still wanted the stars to feature so I stamped them onto a piece of acetate using Versamark Ink. Note: Make sure you use plenty of antistatic powder on the acetate to stop excess powder sticking to acetate – it’s tricky to remove otherwise.
Sprinkle on Fine Detail embossing powder and tap off excess. Heat set CAREFULLY with heat gun so you don’t melt the acetate.
Sentiment
Stamp Sentiments onto Scroll and Tab with Versamark Ink and sprinkle over embossing powder and tap off excess.
Zing Embossing Powder – Purple
Ranger Fine Detail embossing powder – White
Set with heat gun.
Finishing
Using ATG adhere background to card base.
Adhere all images using a mix of glue and dimensional adhesive foam tape.
The days are just rolling by as we deal with the Covid-19 pandemic. As it’s now May, it’s time for a new challenge at AAA Birthday. This month we want to see Things with Wings. Hop on over to the AAA Birthday blog and see what the Design Team have created and a special welcome toEnna as this months guest designer…she has created a STUNNING card this month to inspire you.
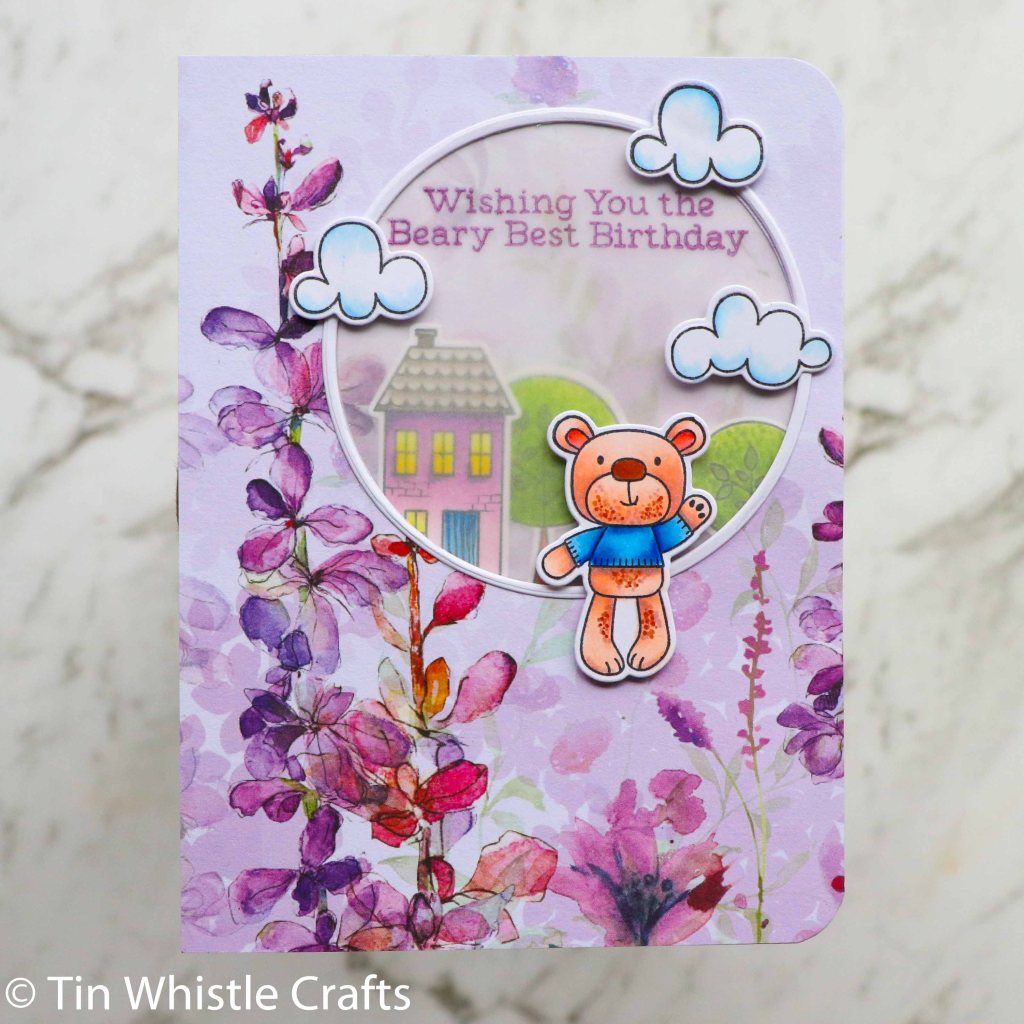
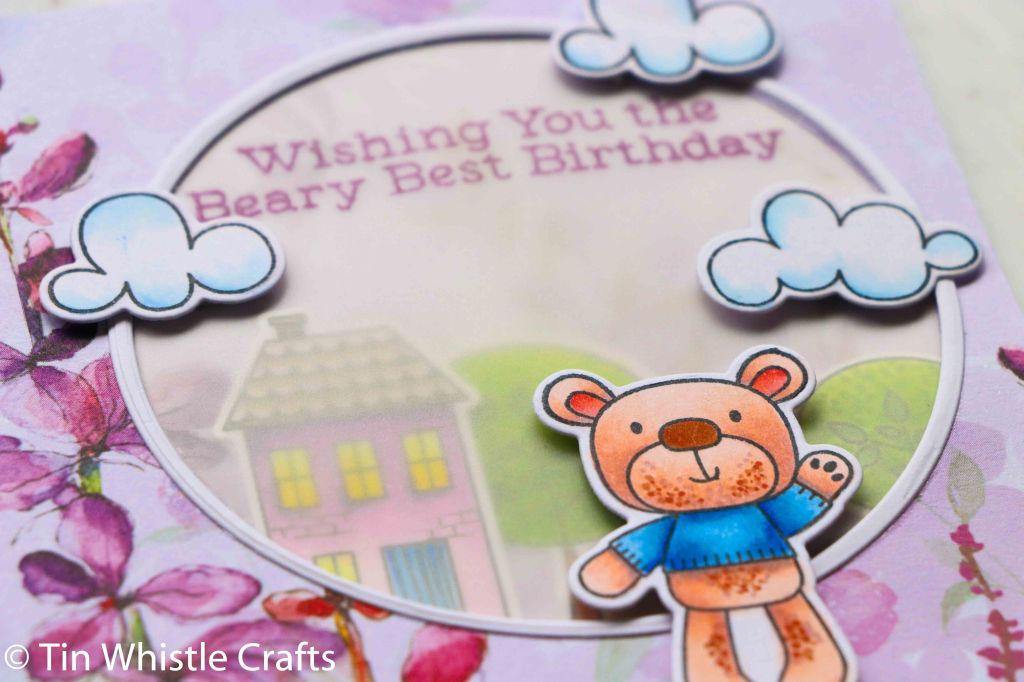
I created this card for the current My Favorite ThingsBirthday Project Challenge. It’s not my usual style of card but I love the final feel of the card and hope it inspires you to try something a bit different.
I have a super pretty 12 x 12 pad of patterned paper from Crafters Choice (Pale Garden) which has some stunning floral images so I chose one and based the colour scheme of the images around that. I used the My Favorite Things Town Bear and Sweet Sloth stamps set. The stamp images were coloured with Copic markers and die cut with the matching dies.
To make the base I cut out the circle out of the patterned paper using a nesting die and using that die plus one slightly larger I made a skinny frame out of plain white cardstock. I adhered the frame to the patterned paper with glue.
I adhered the cut out circle directly onto the cardbase and arranged the background images on top. I then placed a larger circle of thin vellum over the images to mute the look of them, so the card doesn’t look too busy. I really wanted the little bear to stand out.
Using my ATG I taped the patterned paper to the cardbase and then popped up the cutey pie bear and the clouds using dimensional foam.
To finish off I used a corner rounder on two of the corners and that’s it done.
It’s such a strange time in the world now and if you are dealing with the Covid-19 pandemic please stay safe. As it’s now April, it’s time for a new challenge at AAA Birthday. This month we want DOTS and/or STRIPES. Hop on over to the AAA Birthday blog and see what the Design Team have created and a special welcome toBarbara as this months guest designer…she has created a fabulous card this month.