Snail mail

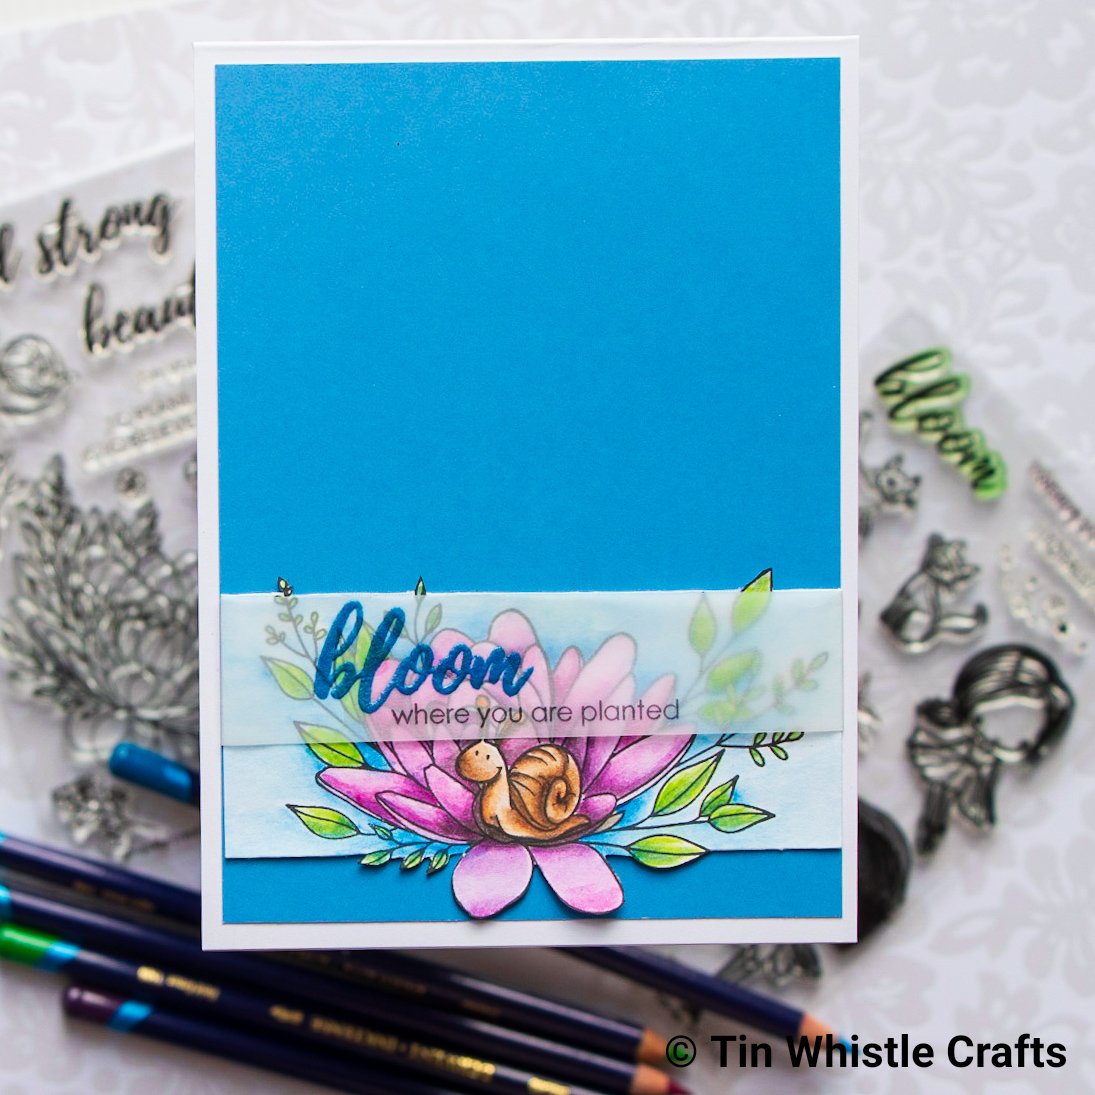
Trying to enter more card challenges this year and so far going well. This card was created for the current AAA Cards CAS Game #132. The challenge was to use up to one third of the card front and optional twist of ‘Masking’.

Images

I received my first subscription from Uniquely Creative –December stamp kit based in Australia and used two of the stamp sets – Standing Strong and Garden Fairies.

  • Stamp images on preferred cardstock with appropriate ink. As I was using Inktense Pencils I needed cardstock that could handle a small amount of water and I used waterproof ink from Versafine Claire in Nocturne.
  • See masking steps below to see how I placed the snail in front of the flower.
  • Colour images with preferred medium. Flower coloured with Fuschia and Mauve. Snail coloured with Willow, Baked Earth, Bark and Indian Ink. Background coloured with Iris Blue and Bright Blue.

Sentiment

  • Stamp “Bloom” with Versamark clear ink and sprinkle with Zing Blue metallic embossing powder.
  • Shake off excess powder and heat set with heat gun.
  • Stamp rest of sentiment in Stazon ink – great for vellum.

Masking technique using a Misti

  1. Stamp image you want in the foreground.
  2. Stamp image again on asking paper and cut out. Place on top of first stamped image.
  3. Position background image stamp over top of masked image to get alignment correct. Pick up stamp with Misti door.
  4. Stamp background image.
  5. Remove masking paper…ta dah!

Finishing

  • Cut image panel down.
  • Wrap sentiment vellum around cut down panel and secure at back with tape.
  • Adhere panel to coloured cardstock with double sided tape.
  • Adhere panel to casebase with ATG gun or your preferred adhesive.

Thanks for stopping by and have a good day.

Handmade by Pip


21 and Fabulous!

My second 21st card this month…well they are actually twins so had both cards ready for the same date. Here is the other card https://tinwhistlecrafts.com/2019/01/16/21st-congrats/

Images

  • Stamped images from My Favorite Things Festive Flamingos with Momento Tuxedo Black (copic friendly ink) on cardstock.
  • Coloured with copic markers and cut out with my Brother Scanncut DX1200.

Background

  • Ink blended Distress Oxide ink Worn Lipstick and Barn Door over Neenah Solar White cardstock.

Die cutting

  • Die cut Twenty One out of glitter cardstock and also craft foam with Spellbinders Etched Alphabet.
  • Adhered the glitter cardstock over the top of craft foam with Ranger Multi Matte Medium.
  • Die cut the ampersand out of green glitter cardstock with Sizzix Thinlets Dainty Lowercase.

Extra Items

  • Die cut hearts from glitter cardstock with My Favorite Things Tab Builder 5 dies.

Finishing

  • Stamped Rosies Studio ‘Fabulous’ sentiment on card base.
  • Added Wink of Stella clear glitter over scarves.
  • Added Glossy Accents over lightbulbs.

Thanks for stopping by and have a good day.

Handmade by Pip


Supplies List

Affiliate links are used when purchasing from Krafters Cart. Other links are direct to the company that sells that product.

MFT – Festive Flamingos
Shop at:
Krafters Cart NZ
Spellbinders Etched Alphabet
Shop at:
Waffle Flower | SSS
My Favorite Things Tag Builder 5
Shop at:
Krafters Cart NZ | MFT
Glossy Accents
Glossy Accents
Shop at:
Krafters Cart NZ
Momento Tuxedo Black
Shop at:
Krafters Cart NZ
Tools Original Misti
Shop at:
Krafters Cart NZ
Wink of Stella
Wink of Stella
Shop at:
Krafters Cart NZ
Distress Oxide Barn Door
Shop at:
Krafters Cart NZ
Distress Oxide Worn Lipstick
Shop at:
Krafters Cart NZ

Have a beautiful day…

A friend is turning 60 shortly and I found the perfect images to use from Mo’s Digital Pencil. I used three digi stamps – Eileen, Potters Corner and Garden Shed Background.

Images

All the images were printed with my inkjet printer onto copic friendly cardstock so I could colour them all with alcohol markers. The potters corner files comes with each item separated so you can build the scene as you want. On the front of the card I added the pot plants in the window and the grow sign onto the front of the shed. As I wanted the scene to be a smaller size the fence didn’t reach the edge of the panel so I freehand drew three more bushes to fill out the scene.

I added the sentiment on the front by stamping a sentiment from My Favorite Things You give me butterflies stamp set onto coloured cardstock with Versamark Embossing Ink. I sprinkled Zing Copper Embossing Powder over the sentiment and heat embossed with an Ozito Heat Tool.

Inside card

The images I used for the inside are cut out with my Brother Scanncut DX1200. I wanted the inside of the card to reflect the inside of the garden shed so I hand drew the panelling of the walls with 4 shades of Copic Markers – W0, W1, W3, W5. The floor was ink blended with Distress Oxide Scattered Straw and Brushed Corduroy. I flicked on some extra Brushed Corduroy to give a more dirt look to the floor.

Thanks for stopping by and have a good day.

Handmade by Pip


Supplies List

Affiliate links are used when purchasing from Krafters Cart. Other links are direct to the company that sells that product.

MFT You give me butterflies
Shop at:
Krafters Cart NZ
Mos Digital Pencil Eileen
Shop at:
Mos DP
Mos Digital Pencil Garden Shed
Shop at:
Mos DP
Mos Digital Pencil Potters Corner
Shop at:
Mos DP
MFT Mini Cloud Edges Stencil
Shop at:
Krafters Cart NZ
Distress Oxide Tumbled Glass
Shop at:
Krafters Cart NZ
Distress Oxide Brushed Corduroy
Shop at:
Krafters Cart NZ
Distress Oxide Scattered Straw
Shop at:
Krafters Cart NZ
Distress Oxide Mowed Lawn
Shop at:
Krafters Cart NZ
Versamark
Versamark
Shop at:
Krafters Cart NZ
Tools Mini Misti
Tools Mini Misti
Shop at:
Krafters Cart NZ
Momento Tuxedo Black
Shop at:
Krafters Cart NZ

21st Congrats

A new card created for a family member. I wanted to try a new technique for the background I had seen recently and it worked perfectly…foiling with gel medium.

Images

I used the Waffle Flower Little Painters images as they are designed to poke out from behind another image, plus they’re very cute.

  • Stamp your images on copic friendly cardstock with Momento Tuxedo Black or another copic friendly ink.
  • Colour with alcohol markers.
  • Cut out with matching dies, Brother Scanncut or fussy cut.

Background

  • Ink blend background with Distress Oxide Inks in Salty Ocean and Tumbled Glass and Mermaid Lagoon. Leave to dry.
  • Place stencil – My Favorite Things Star Celebration – onto card and tape down to crafting surface to stop stencil and card moving.
  • Using a palette knife spread Atelier Heavy Gel medium over stencil.
  • Remove stencil carefully and leave panel to dry.

Tip: The gel medium is dry when the gel becomes transparent and drying times will vary due to climate.

Foiling

  • Heat up laminator – Mine is the Heidi Swapp Mini Minc machine.
  • Place a sheet of foil over the dry panel. I used Gina K Design Heat Reactive Foil.
  • Place panel and foil in a carrier pouch – you can use a folded piece of copy paper if you don’t have the pouches.
  • Run through laminator. I set the heat at a 4. The heat will reactive the gel medium to make it sticky and the foil will adhere to it.

Extra items

Congratulations

  • Cut out My Favorite Things Congratulation circle die out of white cardstock and once out of blue fun foam. Using a blue marker that matches the blues in the card colour the die cuts.
  • Adhere the coloured die cut onto the foam one.
  • Cut out a piece of vellum with a circle die and adhere to the back of the stacked die cuts.

Foiling Numbers

  • Cut the numbers out of cardstock using Altenew Bold Numeral dies.
  • Use the negative portion like a stencil and place on top of another piece of cardstock.
  • Using a palette knife spread Atelier Heavy Gel medium over numbers then remove stencil.
  • Leave to dry, place foil over top and run through a laminator as you did for the background stars.
  • Fussy cut around the numbers or use the original dies to recut the foiled numbers.

Finishing

  • Adhere the critters when you want them positioned. The two back ones are adhered to the congratulations and the front one is adhered to the number.
  • Adhere the numbers with two layers of foam tape to give them dimension and make them slightly higher than the die cut words.
  • Finally adhere the central images to the background and adhere panel to side or top folded cardstock.

Thanks for stopping by and have a good day.

Handmade by Pip


Supplies List

Affiliate links are used when purchasing from Krafters Cart. Other links are direct to the company that sells that product.

Waffle Flower Little Painters
Shop at:
Krafters Cart NZ
MFT Star Celebration Stencil
Shop at:
SSS
Altenew Bold Numerals Die
Shop at:
Krafters Cart NZ
MFT Congratulations
MFT Congratulations
Shop at:
Krafters Cart NZ
Gina K Design Heat Reactive Foil
Shop at:
SSS
Distress Oxide Salty Ocean
Shop at:
Krafters Cart NZ
Distress Oxide Mermaid Lagoon
Shop at:
Krafters Cart NZ
Distress Oxide Tumbled Glass
Shop at:
Krafters Cart NZ
Tools Mini Misti
Tools Mini Misti
Shop at:
Krafters Cart NZ
Momento Tuxedo Black
Shop at:
Krafters Cart NZ

Happy Birthday Challenge Card #304

New challenge #304 on the CAS(E) this Sketch blog. This was a challenging sketch but happy with the one layer card I ended up creating.

Image

I started by selecting the stamp set from Altenew Amazing You.

  • Stamp the images on copic friendly cardstock with Momento Tuxedo Black Ink.
  • Colour images with alcohol markers and added extra depth with Prismacolor Pencils.

Background

  • I wanted to added the stripes from the sketch behind the flowers so I stamped the images again on masking paper and cut them out with my Brother Scanncut DX1200 (with an outline setting of -1).
  • After applying the masks to the design I placed the Altenew Watercolor Stripes stencil over the top and taped it down to stop it moving.
  • As the design was going in different directions I taped off the portions of the card that I didn’t want to apply the design on, starting with the top left corner.
  • I used Clarity stencil brushes to apply Distress Oxide Tumbled Glass over the stencil.
  • Turn the stencil and tape down on bottom corner and apply more ink.

Sentiment and finishing

  • Stamp Ranger Letter-it Happy Birthday sentiment with Mini Misti in Versafine Claire Nocturne. I love this pigment ink for sentiments.
  • Cut down panel with My Favorite Things Blueprints 29 which gives a faux stitched outline to the card.
  • Adhere to a side folded card base in matching coloured cardstock using double sided tape.

Thanks for stopping by and have a good day.

Handmade by Pip


Supplies List

Affiliate links are used when purchasing from Krafters Cart. Other links are direct to the company that sells that product.

Altenew Amazing You
Altenew Amazing You
Shop at:
Krafters Cart NZ
Altenew Watercolor Stripes
Shop at:
Krafters Cart NZ
Clarity Stencil Brushes
Shop at:
Krafters Cart NZ
My Favorite Things Blueprints 29
Shop at:
Krafters Cart NZ
Ranger Letter it Birthday
Shop at:
Krafters Cart NZ
VersaFine Claire Nocturne
Shop at:
Krafters Cart NZ
Distress Oxide Tumbled Glass
Shop at:
Krafters Cart NZ
Tools Mini Misti
Tools Mini Misti
Shop at:
Krafters Cart NZ

Sandy Toes

Boy, a week goes fast…I was too late to enter this card into the previous CA(s)E this sketch challenge but here it is anyway.

Background

  • Step 1 – Mask the shape with your preferred masking material.
  • Step 2 – Ink blend distress oxide inks over background. I used Distress Oxide Tumbled Glass and Chipped Sapphire.
  • Step 3 – Die cut sun shape from Concord & 9th Shine On stamp and die set.
  • Step 4 – Ink blend Distress Oxide inks on a separate piece of cardstock and adhere behind die cut opening. I used Squeezed Lemonade, Mustard Seed and Wild Honey.

Images

  • Step 5 – Stamp images onto copic friendly cardstock (I use Hammermill brand) with copic friendly ink – Momento Tuxedo Black.
  • Step 6 – colour images with alcohol markers.
  • Step 7 – I used my Brother Scan n Cut DX1200 to cut around images. Otherwise you can die cut with coordinating dies or fussy cut.

Final Steps

  • Step 8 – Add extra details. I had to add sand for the Sandy Toes so used three different shades of Altenew Inks to suggest sand. I also added some white gel pen to shorts and blue glitter gel pen to hat.
  • Step 9 – Stamp sentiment. I laid out my images without adhering to check exact location of sentiment and stamped sentiment with my Mini Misti.
  • Step 10 – Adhere images with dimensional foam to pop up images.

Thanks for stopping by and have a good day.

Handmade by Pip


Supplies List

Affiliate links are used when purchasing from Krafters Cart. Other links are direct to the company that sells that product.

Concord & 9th Shine On
Shop at:
C&9
Distress Oxide Chipped Sapphire
Shop at:
Krafters Cart NZ
Distress Oxide Mustard Seed
Shop at:
Krafters Cart NZ
Distress Oxide Squeezed Lemonade
Shop at:
Krafters Cart NZ
Distress Oxide Wild Honey
Shop at:
Krafters Cart NZ
Waffle Flower Sandy Toes
Shop at:
Waffle Flower
Tools Mini Misti
Tools Mini Misti
Shop at:
Krafters Cart NZ
Momento Tuxedo Black
Shop at:
Krafters Cart NZ

MFT Card Challenge

I created this card for the current My Favorite Things Colour Challenge #108 and Sketch Challenge #418. The My Favorite Things Otterly Love You stamp set is so cute. The stamp images were coloured with Copic markers and die cut with the matching dies.

I started by dry embossing the larger Dienamics Stitched Dome nested die onto the background cardstock and masked off the edges so I could ink blend distress oxide Chipped Sapphire over the shape. I then die cut a smaller dome out of white cards stock and used the Dienamics Ocean Waves dies to cut the top of the dome into wave shapes and added some extra wave shapes. I then blended Tumbled Glass, Salty Ocean and Chipped Sapphire over the die cut. To make the waves stand out a bit more I also used the waves dies to cut some vellum and offset them behind the waves.

Once the front die was completed I sprinkled water over it and patted it dry with a paper towel to give a watery effect. The sentiment was heat embossed with Hero Arts White embossing powder.

Tip: Make sure the distress oxide ink is completely dry before heat embossing. To check if it’s dry tip some embossing powder over the card and tip off. If any remains then it’s not quite dry. Use a heat tool to dry completely or leave to air dry for longer.

Finally, I added some Liquitex irridescent medium with a brush to the heart and the fish and coloured over the otters nose and eyes with a black marker to make them darker.

Thanks for stopping by and have a good day.

Handmade by Pip


Supplies List

Affiliate links are used

Mini Misti
Mini Misti
Shop at:
Krafters Cart NZ
MFT Otterly Love You
Shop at:
Krafters Cart NZ
MFT Dienamics Ocean Waves
Shop at:
Krafters Cart NZ
MFT Dynamics Stitched Dome
Shop at:
Krafters Cart NZ
Hero Arts White Embossing Powder
Shop at:
Krafters Cart NZ
Versamark
Versamark
Shop at:
Krafters Cart NZ
Distress Oxide Salty Ocean
Shop at:
Krafters Cart NZ
Distress Oxide Chipped Sapphire
Shop at:
Krafters Cart NZ
Distress Oxide Tumbled Glass
Shop at:
Krafters Cart NZ

Summer Bees

Playing along with my first card challenge for 2019 at CAS(E) this Sketch #302. I used Altenew Get Well Soon stamp set and my Brother Scanncut DX1200 for the name.

Firstly, I blended Distress Oxide Inks over the background (Strathmore Bristol Paper) in Wild Honey and Crushed Olive. I then stamped the three honeycomb images in the stamp set with Altenew Honey Drizzle and Warm Sunshine.

I had designed the name with my Scanncut using the draw and cut feature and coloured with copics. The flowers and bees were stamped on copic friendly cardstock with Momento Tuxedo Black Ink and coloured with the following copic colours.

  • Flower – RV69, RV66, V05, RV63, YR07, Y17, YR21, YR16
  • Bees – YR07, Y17, YR21, C7, W7, W5, W1, C3
  • Name – RV66, V05, RV63

Finally, I popped up the images with difference thicknesses of foam adhesive tape.

Thanks for stopping by.


Handmade by Pip