Musical twist challenge

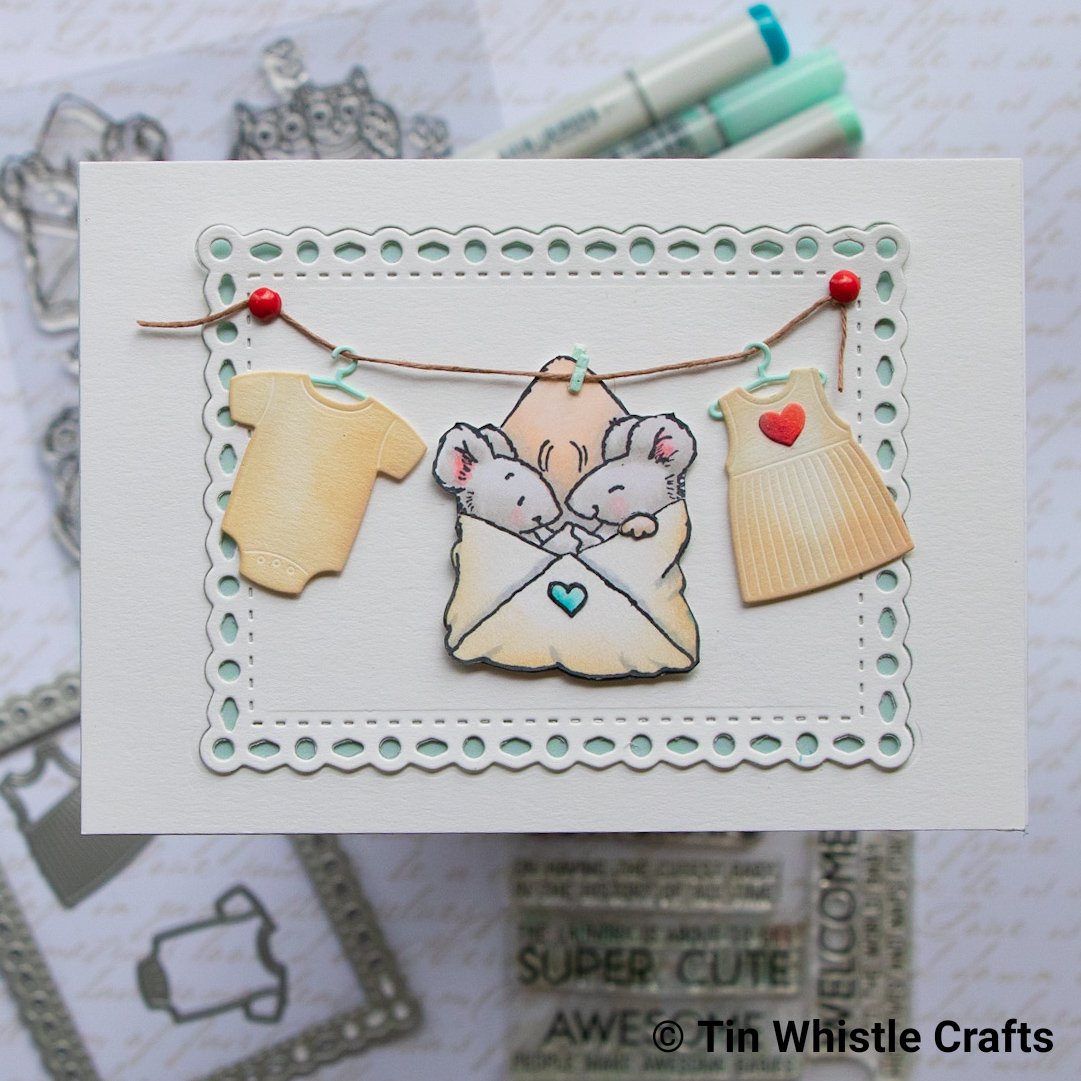
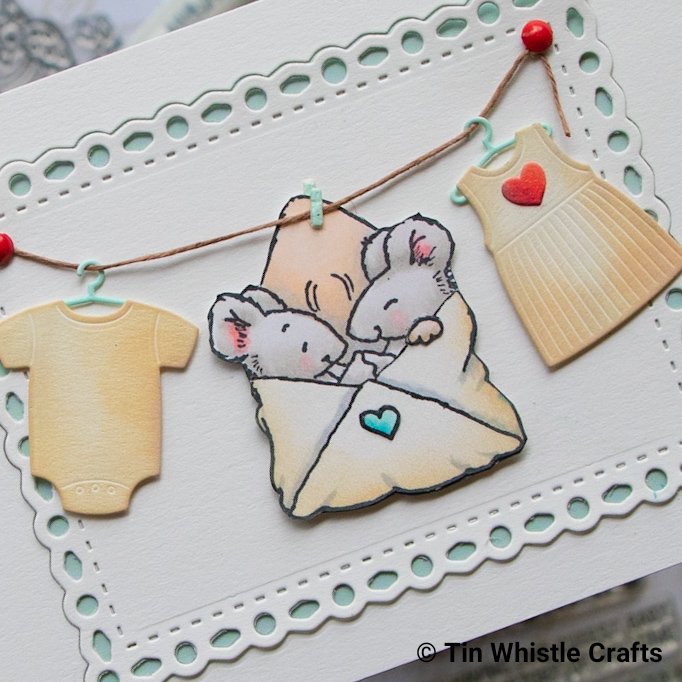
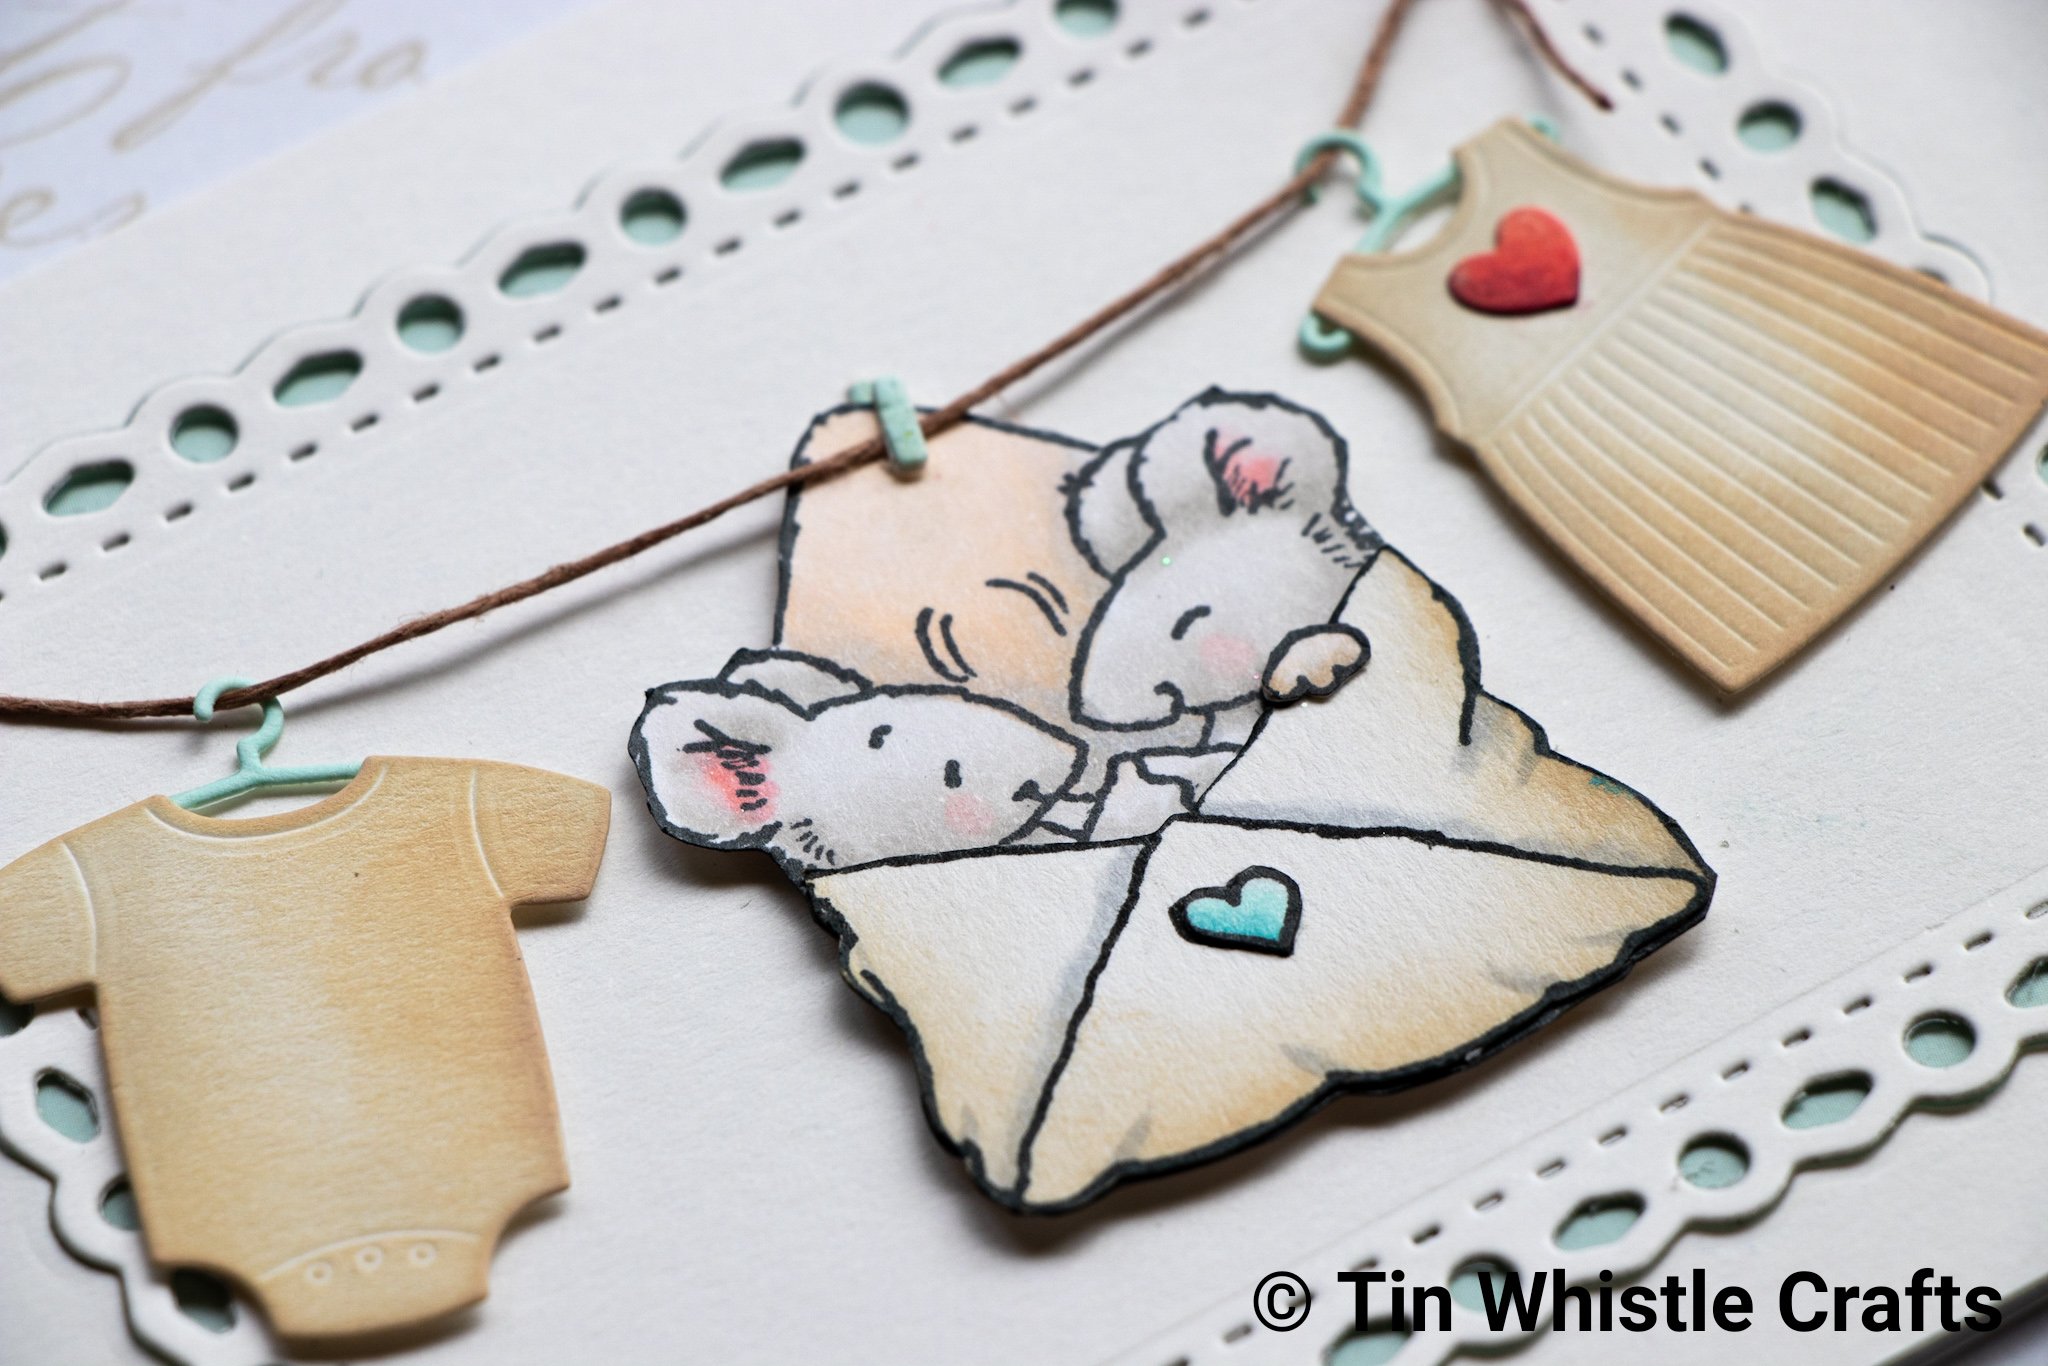
I’m really enjoying entering more card challenges this year. This card is for the current AAA Cards Case Game #134.

Images

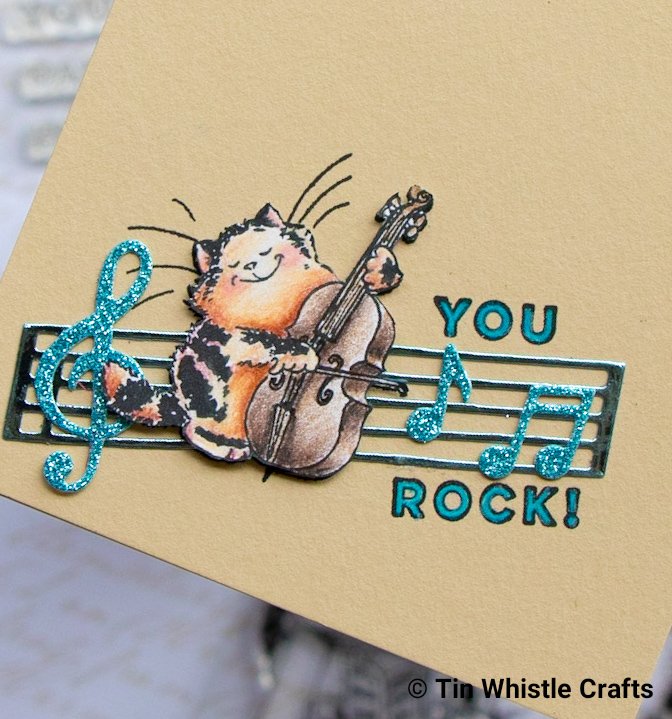
  • Stamped Penny Black Jazzy Cats image onto paper appropriate to use with coloured pencils with Versafine Nocturne ink.
  • Colour with Prismacolor coloured pencils. Cat – 945 Sienna Brown, 997 Beige, 944, Terra Cotta, 937 Tuscan Red, 928 Blush Pink, 1014 Deco Pink. Cello – 941 Light Umber, 946 Dark Brown, 947 Dark Umber, Black.
  • Fussy cut by hand.

Tip 1: When fussy cutting image by hand you can be left with the white core of the cardstock showing around the edge. Run a black marker around the outside edge of the image to hide the white. This can hide some not so perfect cutting as well.

Other items

  • Using Lawn Fawn Little Music Notes die set, diecut the notes out of glitter cardstock.
  • Diecut the music paper lines out of foiled cardstock.
  • Adhere the notes to the music lines with liquid glue

Sentiment

  • Place the cardbase (kraft cardstock) in a Mini Misti.
  • Temporarily place the image and die cuts on the cardbase.
  • Position the Uniquely Creative Block Outline sentiment where you wish to stamp it and pick up with the misti door (see Tip 2 below)
  • Remove image and die cuts and stamp with Versafine Nocturne ink.
  • Coloured with Prismacolor coloured pencils – 905 Aquamarine, 1027 Peacock Blue.

Tip 2: The sentiment was orignally “You Totally Rock” but this was too long for what I wanted so I cut it apart and justs used the “You Rock”. Don’t panic too much doing this…you can still use the entire original sentiment another time – the cut ends will match up.

Background

  • When I fussy cut the cat image I cut off the whiskers as they would have been fiddly to cut around. To add them back into the image I just restamped the cat onto the background kraft cardstock and will adhere cutout image over the top.

Finishing

  • Using ATG adhere background to card base.
  • Adhere music notes to cardbase using liquid glue.
  • Adhere cat over prestamped image with dimensional foam.

Thanks for stopping by and have a good day.

Handmade by Pip


Affiliate links are used when purchasing from Krafters Cart. Other links are direct to the company that sells that product.

Momento Tuxedo Black
Shop at:
Krafters Cart NZ
Tools Mini Misti
Tools Mini Misti
Shop at:
Krafters Cart NZ
VersaFine Claire Nocturne
Shop at:
Krafters Cart NZ
Penny Black Jazzy Cats
Shop at:
Penny Black
Lawn Fawn Little Music Notes
Shop at:
Krafters Cart NZ
Uniquely Creative Block Outline
Shop at:
Krafters Cart NZ

Inspired by…time to write

New card to enter into the current Inspired by challenge. I made the deadline this time!

I decided to use the colour scheme, frame, envelope and clothesline for my card.

Images

  • Stamped Penny Black Critter Love image onto Hammermill cardstock with Momento Tuxedo Black ink (copic friendly ink and cardstock).
  • Colour with Copics – W0, W1, W3, N0, N2, R20, R22, E50, E53, BG10, BG11, BG37, R14, R27, R59.
  • Fussy cut by hand.

Tip: When fussy cutting image by hand you can be left with the white core of the cardstock showing around the edge. Run a black marker around the outside edge of the image to hide the white. This can hide some not so perfect cutting as well.

Background

  • Die cut Kaisercraft frame out of Colourfield Snow White 250g cardstock (any brand will do).
  • Adhere the outside and inside frame to a piece of coloured paper that will show through the frame. I only place double sided tape on the solid piece of the inside frame so the cut out parts stick up a little bit from the background (see closeup photo below).

Other items

  • Diecut the baby clothes, My Favorite Things Bundle of clothes, out of Snow White cardstock and blend Distress Oxide Tea Dye over outside portions of die cuts.
  • Diecut heart, hangers and pegs pieces out of white cardstock and colour with matching copics.
  • Adhere the clothes to the hangers with liquid glue and the heart to the dress.

Finishing

  • Tie twine for line to red brads and apply to card front.
  • Position the mice and clothes to card front with dimensional foam.
  • Using ATG adhere background to card base.
  • Stamp sentiment inside the card. I used My Favorite Things Welcome Baby sentiment “AWESOME people make AWESOME babies”.

Thanks for stopping by and have a good day.

Handmade by Pip


Affiliate links are used when purchasing from Krafters Cart. Other links are direct to the company that sells that product.

Momento Tuxedo Black
Shop at:
Krafters Cart NZ
Tools Mini Misti
Tools Mini Misti
Shop at:
Krafters Cart NZ
My Favorite Things Bundle of Clothes
Shop at:
Krafters Cart NZ
My Favorite Things Welcome Baby
Shop at:
Krafters Cart NZ
Penny Black Critter Love
Shop at:
Penny Black
Distress Oxide Tea Dye
Shop at:
Krafters Cart NZ

Inspired by…

New card I was going to enter into the current Inspired by challenge…but once again I missed the cut off date! Oh well here it is anyway.

Started off with a completely different design idea but couldn’t get it to work how I wanted so decided to go literal with the theme and sketch. I used the Hero Arts Monthly Kit April 2018. Love how it all turned out.

Images

  • Stamped cacti onto Hammermill cardstock with Momento Tuxedo Black ink.
  • Colour with Copics – YG11, YG13, YG25, G21, G24, YG67,G12, G14, G16, V05, RV66, R20, R22, R24
  • Diecut with matching dies

Background

  • Ink blended Distress Oxide Inks (Twisted Citreon, Bundled Sage and Mowed Lawn) over Strathmore Bristol Smooth Cardstock.
  • Apply three strips of double sided tape over cardstock. Remove one strip of release tape and sprinkle glitter over. Burnish with your finger or a bone folder. Tap off excess glitter.
  • Repeat the application of glitter using different shades of green.

Sentiment

  • Stamp the banner and sentiment onto cardstock.
  • Diecut with matching die.
  • As I used a non copic friendly ink I decided to shade the banner with Chameleon pencils but any coloured pencil will do.

Finishing

  • As I wanted to make a paper bag for the cactus (as in the photograph inspiration) I used the tissue that came with the kit. Pretty cute aye!
  • Using ATG adhere background to card base.
  • Adhere the bag and cactus with the sentiment last.

Thanks for stopping by and have a good day.

Handmade by Pip


Affiliate links are used when purchasing from Krafters Cart. Other links are direct to the company that sells that product.

Distress Oxide Mowed Lawn
Shop at:
Krafters Cart NZ
Momento Tuxedo Black
Shop at:
Krafters Cart NZ
My Monthly Hero Arts Kit April 2018
Shop at:
Hero Arts
Strathmore Bristol Smooth
Shop at:
Krafters Cart NZ
Tools Mini Misti
Tools Mini Misti
Shop at:
Krafters Cart NZ
Distress Oxide Bundled Sage
Shop at:
Krafters Cart NZ
Distress Oxide Twisted Citron
Shop at:
Krafters Cart NZ

Retro Girl

Such a fun theme at the current Time Out Challenges – Retro with the optional twist of One Layer. My Retro take on this challenge was incorporating Hippie and Flower Power…I had the perfect digistamp from Lily of the ValleyThoroughly Modern Misses June.

Images

  • Printed digistamp onto Hammermill cardstock with inkjet printer. This is safe for colouring with alcohol markers.
  • Colour with Copics – B23, B18, B26, R02, R05, R27, Y11, Y32, Y26, E0000, E00, E02, BV00, N0, N2, N4, C1.

Background

  • Cut out mask of girl (See ‘Tip’ below).
  • Die cut background mask out of copy paper (thin) using Penny Black Antique Frames dies.
  • Place masks over printed image (see image ‘Masks‘ below).
  • Stamp My Favorite Things Bundles of Blossoms background stamp over masks.
  • I then dry embossed using the same Antique Frames die.

Tip for creating mask of digistamp: I scanned image with my Brother Scan n Cut DX1200 and cut out of post it label tape. Otherwise, print out image again on copy paper and hand cut.

Masks

Sentiment

  • I had the perfect sentiment from the Hero Arts My Monthly Hero Kit March 2018. The shape fitted the image perfectly.
  • Stamp the sentiment in Versafine Claire Nocturne.

Finishing

  • I wanted to spotlight the image so coloured around the outline with Copic Marker ‘C1’.
  • Using ATG adhere background to card base.

Thanks for stopping by and have a good day.

Handmade by Pip


Affiliate links are used when purchasing from Krafters Cart. Other links are direct to the company that sells that product.

VersaFine Claire Nocturne
Shop at:
Krafters Cart NZ
Tools Original Misti
Shop at:
Krafters Cart NZ
MFT Bundles of Blossoms
Shop at:
Krafters Cart NZ
Penny Black Antique Frames
Shop at:
Krafters Cart NZ
My Monthly Hero Arts Kit March 2018
Shop at:
Hero Arts

Sassy Kitty

I love the Sassy sentiments in Technique Tuesday Sassy Birthday Sentiments stamp sets so this was perfect for my card for the current Sisterhood of Snarky Stampers challenge #128 – K is for Kitties.

Images

  • Stamp image onto copic cardstock with Momento Tuxedo Black Ink.
  • Coloured with Copics B00, B000, B02, R14, R 27, R46, R89, V99, R20, R00, E31, E33, E35, E21, E23, E25.
  • Cut out with Brother Scanncut DX1200.

Background

  • Using Park Lane Mini Heart embossing folder emboss
    dark brown/grey cardstock.

Envelopes

  • Cut out shapes for envelopes using dies. I used My Favorite Things Blueprints 29 for the envelope flap and one of the Mama Elephant Flip Slider shape for the envelope base. Just use whatever you have or handcut.
  • Blend Distress Oxide ink in Frayed Burlep lightly around all the edges of the envelope base and the two angled edges of the flap.
  • Adhere flap to base. I used 1/8 double sided tape and thin dimension foam to pop the flap up a bit.
  • Die cut hearts out of red coloured cardstock and adhere to envelope. I used the hearts from My Favorite Things Tag Builder 5.

Sentiment

  • Stamp sentiment on same coloured cardstock as base with Versamark Embossing Ink.
  • Sprinkle Zing Brown Sugar embossing powder over and tap off.
  • Heat embossing powder with heat tool. I use an Ozito Heat Gun.
  • Cut out sentiment with the My Favorite Things Blueprints 29 tag.

Finishing

  • Using ATG adhere background to card base.
  • Adhere envelopes with double sided tape.
  • Adhere image using dimensional foam.
  • Adhere sentiment with dimensional foam.
  • Add Wink of Stella clear glitter to all hearts.

Thanks for stopping by and have a good day.

Handmade by Pip


Affiliate links are used when purchasing from Krafters Cart. Other links are direct to the company that sells that product.

Penny Black Hearts Aplenty
Shop at:
Penny Black
My Favorite Things Blueprints 29
Shop at:
Krafters Cart NZ
Versamark
Versamark
Shop at:
Krafters Cart NZ
Tools Mini Misti
Tools Mini Misti
Shop at:
Krafters Cart NZ
My Favorite Things Tag Builder 5
Shop at:
Krafters Cart NZ | MFT
Wink of Stella Clear
Shop at:
Krafters Cart NZ
Distress Oxide Frayed Burlap
Shop at:
Krafters Cart NZ

Have a Mice Day

A fun card made for a friend turning 60. I love Penny Black images but have only just purchased my first stamp sets (more than one of course) that I managed to source in New Zealand. This one is from the Especially Micey set.

Images

  • Stamp images onto copic cardstock with Momento Tuxedo Black Ink.
  • Coloured with Copics W0, W1, W3, W5, B00, B000, B02, B24, B26, B29, R14, R 27, R46, R89, V99, R20, R00.
  • Cut out with Brother Scanncut DX1200.

Die cuts

  • Colour white cardstock with blue and red copics.
  • Cut Happy Birthday out of blue cardstock using Penny Black Happy Birthday die. Cut again out of blue craft foam and adhere cardstock on top of fun foam.
  • Using Lawn Fawn Party Balloons dies cut a heart balloon out of red card.
  • Using My Favorite Things Little Numbers Dienamics cut “60” and the baloon string out of Satin Silver cardstock. Adhere to balloon shape.

Background

  • Using Taylored Expressions Cross Stitch embossing folder emboss
    warm grey cardstock. This matches the Warm Greys used to colour the mice.

Finishing

  • Using ATG adhere background to card base.
  • Adhere the mice and balloon to card with dimensional foam tape. I used thin foam so the card wasn’t too bulky with the extra thickness of the craft foam.
  • Using Ranger Multi Medium Matte liquid glue adhere Happy Birthday.

Thanks for stopping by and have a good day.

Handmade by Pip


Celebrate…

Here is another card I’ll be entering it in the current challenges – Case this Sketch #307 and Southern Girls Challenge.

The images are from a stamp set called ‘Love you More’ from the new stamp company, The Rabbit Hole Designs.

Images

  • Stamp images on cardstock suitable for alcohol markers using Momento Tuxedo Black.
  • Coloured with G00, YG41, G02, G05, R32, R35, R37, B93, B95, B97, W1, W3, W5, W7, Black, E11, E15, E18, E000, E00, E02, E04, R22
  • Cut out with Brother Scan n Cut DX1200.

Die cut

  • Adhered double sided tape to a piece of blush coloured cardstock.
  • Placed Birch Press Celebrate Sugar Script die half over the double sided tape and half over plain card.
  • Die cut and peeled off the release paper from the bottom part of the die cut.
  • Rub Nuvo Gilding Flakes in Sunkissed Copper over tape portion and burnish with finger.

Finishing

  • Die cut Rosies Studio Pink Lemonade foiled vellum to place behind image.
  • Cut down Rosies Studio Arabesque patterned paper to the size you require and adhere to card base using ATG.
  • Adhere vellum and coloured image.
  • Adhere die cut with Ranger Mono Multi liquid glue.
  • Stamp hearts from stamp set in Hero Arts Unicorn White pigment ink.
  • Add Glossy Accents to the glasses.

Thanks for stopping by and have a good day.

Handmade by Pip


Supplies List

Affiliate links are used when purchasing from Krafters Cart. Other links are direct to the company that sells that product.

Birch Press Celebrate
Shop at:
Krafters Cart NZ
Tools Mini Misti
Tools Mini Misti
Shop at:
Krafters Cart NZ
Glossy Accents
Glossy Accents
Shop at:
Krafters Cart NZ
Momento Tuxedo Black
Shop at:
Krafters Cart NZ

Kiss kiss kiss

When I sign off letters or cards I always put three kisses, so this card came together perfectly for me. I’ll be entering it in the current challenges – Case this Sketch #307 and Southern Girls Challenge.

The images from the the new stamp company The Rabbit Hole Designs are so sweet so I know I’ll be using this set, ‘Love you More’, a lot.

Images

  • Stamp images on cardstock suitable for alcohol markers using Momento Tuxedo Black.
  • Coloured with G00, YG41, G02, G05, R32, R35, R37, B93, B95, B97, BG45, BG49, W1, W3, W5, W7, Black, E11, E15, E18 E000, E00, E02, E04, R22
  • Cut out with Brother Scan n Cut DX1200.

Die cut

  • Die cut Birch Press Big You Sugar Script with a black shadow and
    Rosies Studio Arabesque patterned paper.
  • Adhere two die cuts using liquid glue to give you a bit of wiggle room as you line up the dies.

Sentiment

  • Position image and die cut on card base in a Misti Original (useful if you want to double stamp).
  • Place Love and Kiss in place and pick up with Misti door.
  • Stamp with red and grey Altenew mini ink cubes.
  • I moved the cardbase to the left in my Misti to line up the 2nd and 3rd kiss word.

Tip: Using the original Misti (6 1/2″ x 8 1/2″) allows you to move the card around rather than change the position of the stamp – useful for sentiments.

Finishing

  • Place panel on card base using ATG.
  • Adhere die cut with double sided tape and image with foam adhesive tape to give some dimension.
  • Added Glossy Accents to the glasses and Wink of Stella Clear to the balloons.

Thanks for stopping by and have a good day.

Handmade by Pip


Supplies List

Affiliate links are used when purchasing from Krafters Cart. Other links are direct to the company that sells that product.

Glossy Accents
Glossy Accents
Shop at:
Krafters Cart NZ
Momento Tuxedo Black
Shop at:
Krafters Cart NZ
Tools Original Misti
Shop at:
Krafters Cart NZ
Wink of Stella
Wink of Stella
Shop at:
Krafters Cart NZ
Birch Press Big You
Birch Press Big You
Shop at:
Krafters Cart NZ