Totally Tropical

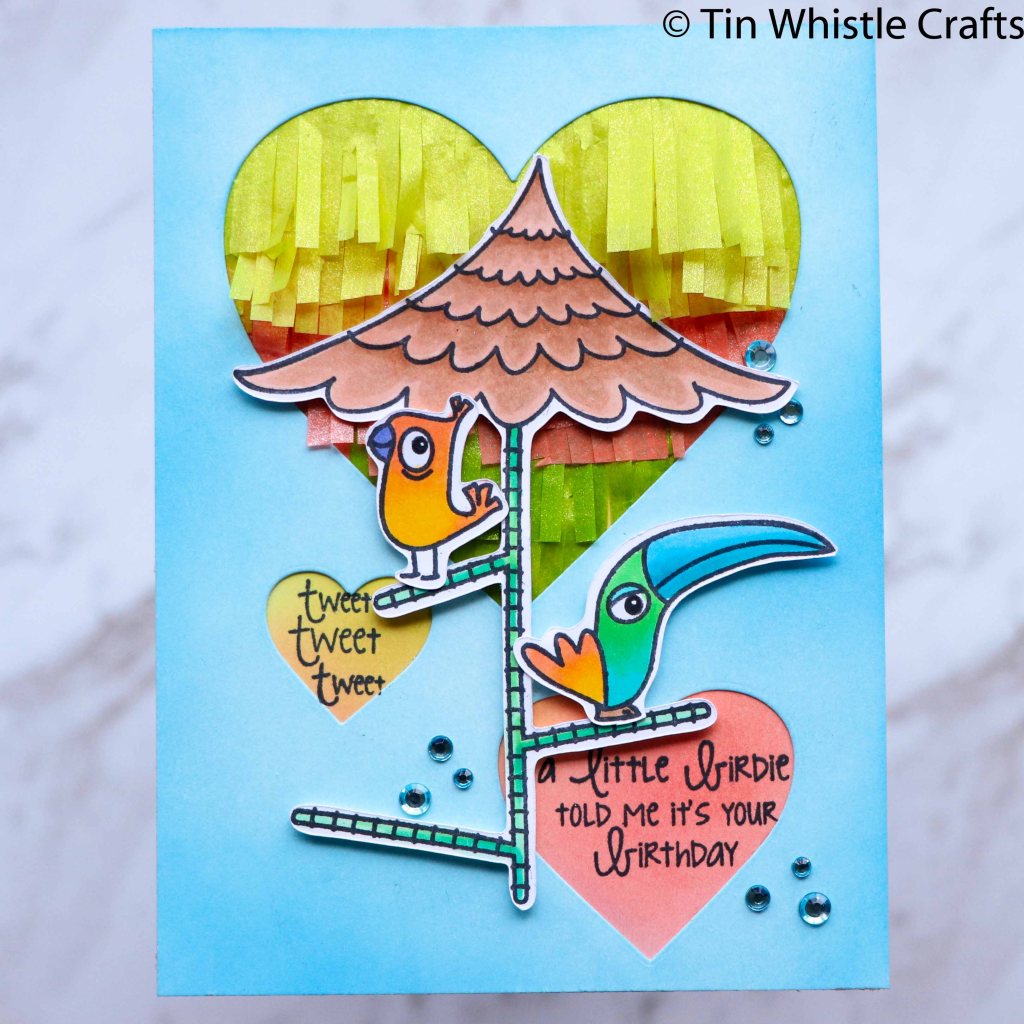
I made this card to enter into the current Seize the Birthday challenge – Totally Tropical . This Avery Elle stamp set is my go to when I want a tropical theme.

products used

  • Avery Elle Tweet Tweet
  • My Favorite ThingsStitched Heart Stax
  • Lia Griffiths – Frosted Tissue
  • Distress Oxides – Salty Ocean, Tumble Glass, Abandoned Coral, Twisted Citron
  • Copics (see colours below)

Images

  • Stamp images on your preferred alcohol marker cardstock, colour and cut out. I used my Brother Scan N Cut. Colours used as follows:
imageCopic colours
ToucanY35/YR02, G14/BG15, BG02/05/07
Orange BirdY35, YR02, BV04
UmbrellaE11/E23, G02/G14/G16

Background

  • Top Layer
    • Cut out hearts using die (this die set puts stitched lines around hearts but that wasn’t the part I used on this card – I’ll put those aside for another card)
    • Ink blend with Tumbled Glass and Salty Ocean
  • Card Base
    • Ink blend distress oxide inks Abandoned Coral and Twisted Citron over background.
    • Adhere three colours of fringed frosted tissue to base to fill large heart shape.
  • Adhere top layer to card base.
  • Sentiments
    • Line up sentiments in cut out of two smaller hearts and stamp with black ink.

Finishing

  • Adhere all images using dimensional adhesive foam tape.
  • Adhere crystal embellishments.

Thanks for stopping by and have a good day.

Handmade by Pip


Whee….we’re free

I made this card to enter into two challenges – Case this Sketch (I turned the sketch on its side) and Time Out Challenges. I love the Stacey Yacula stamp sets produced by My Favorite Things.

products used

  • Derwent Inktense Pencils (see colours below)
  • My Favorite Things Stacey Yacula Sky High
  • Altenew Circled Sentiments
  • Altenew Ink Razzleberry
  • Blue Cardstock
  • Distress Oxide Salty Ocean
  • Memory Box Stitched Rectangles
  • Heidi Swapp Washi Tape
  • Foil Washi Tape

Images

  • Stamp images on your preferred watercolour cardstock, colour using Derwent Inktense Pencils and cut out. I used my Brother Scan N Cut. Colours used as follows:
imageInktense colours
PlaneFelt Green
FoxWillow/Baked Earth
HedgehogBaked Earth
FlagFuschia
CloudsIndian Ink
BirdIris Blue/Baked Earth

Background

  • Cut rectangle out of blue cardstock with stitched die.
  • Sponge Distress Oxide Salty Ocean around edges.
  • Adhere to cardbase.

Sentiment

  • Stamp circle sentiment onto white cardstock with Altenew Razzleberry ink
  • Cut out with a circle die. I used a larger die so it had a border around it.

Finishing

  • Adhere all images using dimensional adhesive foam tape.
  • I added the dotted washi tape to white cardstock and cut into two strips. I wanted to add some extra green into scene so I added a strip of green foil tape to background first.

Thanks for stopping by and have a good day.

Handmade by Pip


Cast a Spell

I have recently purchased a couple of new stamp sets from Whimsy Stamps and it was perfect timing to enter a card in the current Sisterhood of Snarky Stampers Challenge #159 – M is for Magic.

products used

  • Whimsy StampsCreate Magic and Cast a Spell
  • My Favorite ThingsBlueprints 29 dies
  • Altenew Tiny Stars
  • Tonic Studios – Verso Framed Screens die
  • Distress Oxide Inks – Blueprint Sketch, Salty Ocean, Wilted Violet
  • Copics – see colours below
  • Ranger Fine Detail embossing powder – White

Background

  • Using Distress Oxides – ink blended three colours randomly over background. Repeat until desired colour depth achieved.
  • Making sure ink is dry (blast it with your heat gun to speed drying up), stamp Tiny Stars randomly over background using Versamark Ink, turning stamp around to achieve a more random layout of stars. Sprinkle embossing powder over, tap off excess and set with your heat gun.
  • Die Cut background using the Verso Frame (also diecut the cardbase using the larger die to have a slightly shaped card).

Images

  • Stamp images on your preferred copic friendly cardstock and fussy cut up to stamped edges. Colours used as follows:
imagecolours
ScrollW0, W1, W3, W5
Spider and ShoesV12, V14, V17
Cider jar, trim on wizard and tabG12, G14, G16, G17
Wizard clothesB000, B00, B02, B05 B18
SkinE0000, E00, E02, BV01
Facial HairC0, C1, C3, C5

Extra items

shelf and tab

  • Blend copic ink over cardstock (using same blues and greens as in other images)
  • Die cut shapes

Wizard’s stars

  • I initially coloured the stars but as I fussy cut the wizard out I realised that the stars were going to be too fiddly to fussy cut so I cut them off.
  • I still wanted the stars to feature so I stamped them onto a piece of acetate using Versamark Ink. Note: Make sure you use plenty of antistatic powder on the acetate to stop excess powder sticking to acetate – it’s tricky to remove otherwise.
  • Sprinkle on Fine Detail embossing powder and tap off excess. Heat set CAREFULLY with heat gun so you don’t melt the acetate.

Sentiment

  • Stamp Sentiments onto Scroll and Tab with Versamark Ink and sprinkle over embossing powder and tap off excess.
    • Zing Embossing Powder – Purple
    • Ranger Fine Detail embossing powder – White
  • Set with heat gun.

Finishing

  • Using ATG adhere background to card base.
  • Adhere all images using a mix of glue and dimensional adhesive foam tape.

Thanks for stopping by and have a good day.

Handmade by Pip


AAA Birthday – Game #13 – Things with Wings

The days are just rolling by as we deal with the Covid-19 pandemic. As it’s now May, it’s time for a new challenge at AAA Birthday. This month we want to see Things with Wings. Hop on over to the AAA Birthday blog and see what the Design Team have created and a special welcome to Enna as this months guest designer…she has created a STUNNING card this month to inspire you.

Continue reading

Sneaky Explorers – 12 x 12 Scrapbooking layout

Hey everyone. This is the third and final layout for the White with 1 Cyber Crop on Facebook. This time it was a step by step challenge…and I guess that’s why it’s called a challenge because it certainly was for me.

Photo Story

These two kiddos…this is what happens when all goes quiet!!! I snuck the first photo without them knowing I was there. This was taken in 1999 and as they were still in their pyjamas they must have woken up feeling mischevious. I did have a play with the photo in Photoshop before I printed them out and made the background black and white and only had colour for the ‘escapees’ so they stood out better in the photo.

Continue reading