

I’m back for this month challenge over at AAA Birthday after having a crazy last month…family matters have to take precedence but after a number of weeks out of my craft room I have realised how much making cards and crafting fills my almost empty reservoir up! This month I went all girly with my DT card. Pop on over to the AAA Birthday blog and see all the neat inspiration our design team has come up with and we especially welcome Karthika as our Guest Designer this month.


PRODUCTS
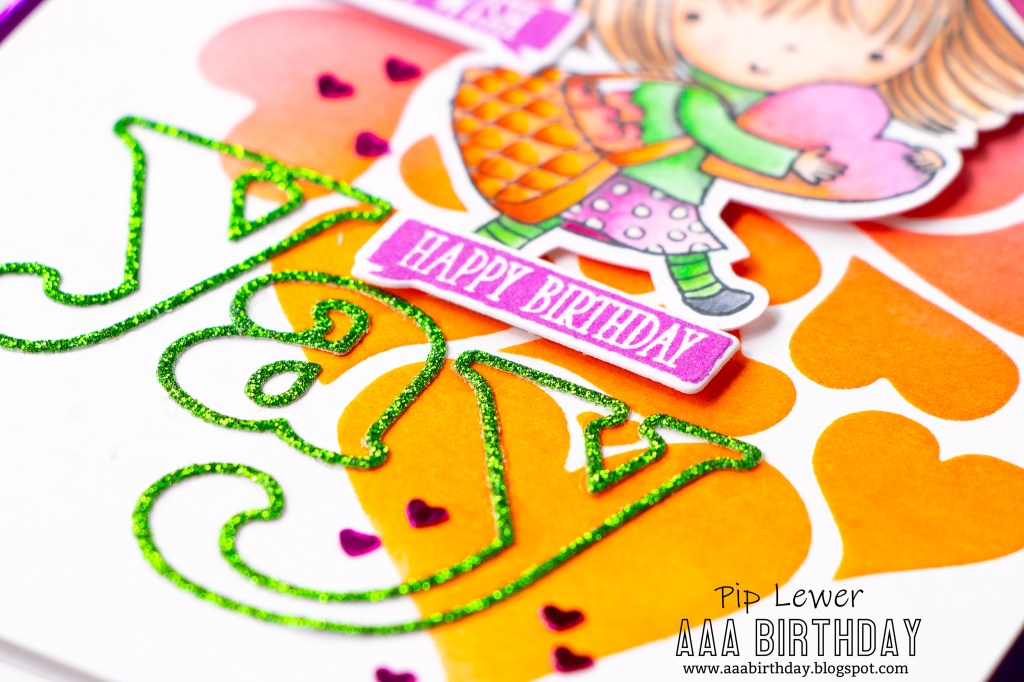
- Penny Black I heart you (oldy but a goody) stamp set
- Clearly Besotted So to Speak stamp and die set
- Funky Fossil Designs Lots of Hearts Stencil
- Pinkfresh Studio Heather Lowercase and Lea’s Ornate Lowercase alphabet dies
- Copics
- Distress Oxide Inks – Ripe Persimmon, Picked Raspberry and Seedless Preserves
- Glitter cardstock and foil washi tape
- Altenew Razzleberry Ink
Process
background
- I dry embossed the background with the heart stencil. I used my Spellbinders Platinum machine so the sandwich I used to dry emboss is:
- Cardstock
- Stencil
- tan embossing mat
- embossing plate
- I left the stencil in place to ink blend the distress oxides over the raised embossing.
images
- I stamped the sweet girl onto copic friendly cardstock and coloured with copic markers that matched the ink blended heart background. I added some green in to give a bit of lift to the card.
- I used my Scan n Cut machine to cut the image out.

Sentiment
- I had given myself a treat recently and purchased the Heather and Lea lowercase alphabet dies from Pinkfresh Studio. They are amazing. Oh and of course I purchased the Heather Uppercase die set too! I only used the outline die cut out of glitter cardstock and love how versatile these sets will be. Well worth the investment.
- The speech bubble sentiments were stamped with Altenew Razzleberry inks and then cut out with the matching dies. This is also my “oldy but a goody” go to set.
Finishing
- I adhered the glitter letters directly to the background and then popped up the image and two speech bubbles with foam adhesive tape for dimension.
- I had cut the heart background down a bit so I could add some coloured edging to the sides of the card base. I had the perfect foil tape for this.
- After adhering the background to the cardbase I finished off with a few hearts scattered randomly and adhered with glossy accents.
I hope you’ve been inspired to join us in this months challenge.
Thanks for stopping by and have a good day.

What a gorgeous card Pip – love the yay die cut – that look to be a wonderful set of dies!Stay safe
Blessings
Maxine
LikeLiked by 1 person
I always look forward to seeing your cards and this one is magic! Love those pinks and oranges together and the large yay is perfect!
LikeLiked by 1 person